containerization-and-devops
Lab 4: Docker Essentials
Objective
Learn Docker fundamentals including containerizing applications with Dockerfiles, building and tagging images, running containers, multi-stage builds, and working with multiple application stacks (Python Flask & Node.js).
Part 1: Containerizing Applications with Dockerfile
Step 1: Create a Simple Flask Application
app.py — A simple Flask web server with two endpoints:
from flask import Flask
app = Flask(__name__)

@app.route('/')
def hello():
    return "Hello from Docker!"

@app.route('/health')
def health():
    return "OK"

if __name__ == '__main__':
    app.run(host='0.0.0.0', port=5000)
requirements.txt:
Flask==2.3.3
Step 2: Create Dockerfile
# Use Python base image
FROM python:3.9-slim

# Set working directory
WORKDIR /app

# Copy requirements file
COPY requirements.txt .

# Install dependencies
RUN pip install --no-cache-dir -r requirements.txt

# Copy application code
COPY app.py .

# Expose port
EXPOSE 5000

# Run the application
CMD ["python", "app.py"]
Part 2: Using .dockerignore
.dockerignore File
# Python files
__pycache__/
*.pyc
*.pyo
*.pyd

# Environment files
.env
.venv
env/
venv/

# IDE files
.vscode/
.idea/

# Git files
.git/
.gitignore

# OS files
.DS_Store
Thumbs.db

# Logs
*.log
logs/

# Test files
tests/
test_*.py
Why .dockerignore is Important
- Prevents unnecessary files from being copied into the image
- Reduces image size by excluding development/test files
- Improves build speed by reducing build context
- Increases security by keeping sensitive files out of images
Part 3: Building Docker Images
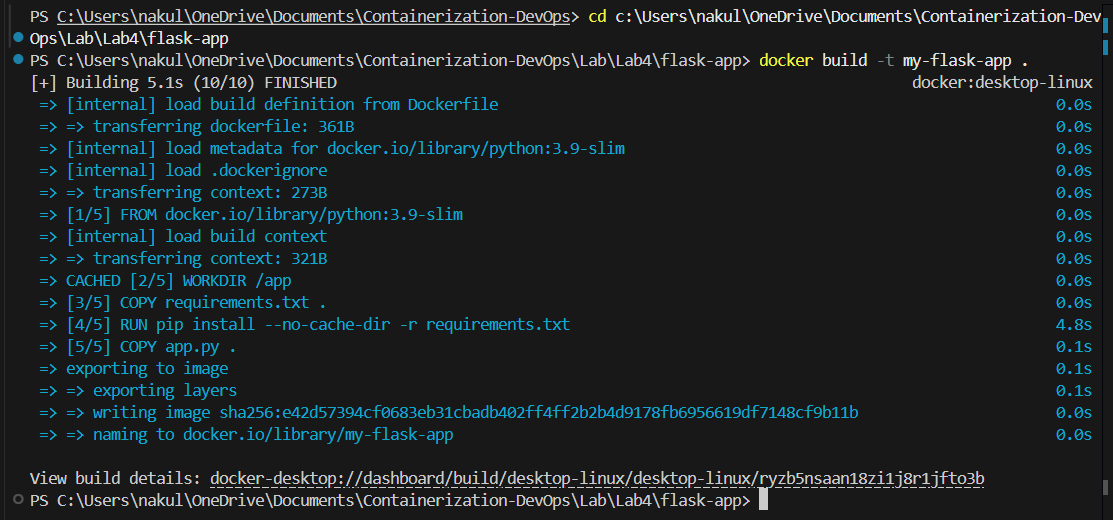
Step 1: Basic Build
docker build -t my-flask-app .
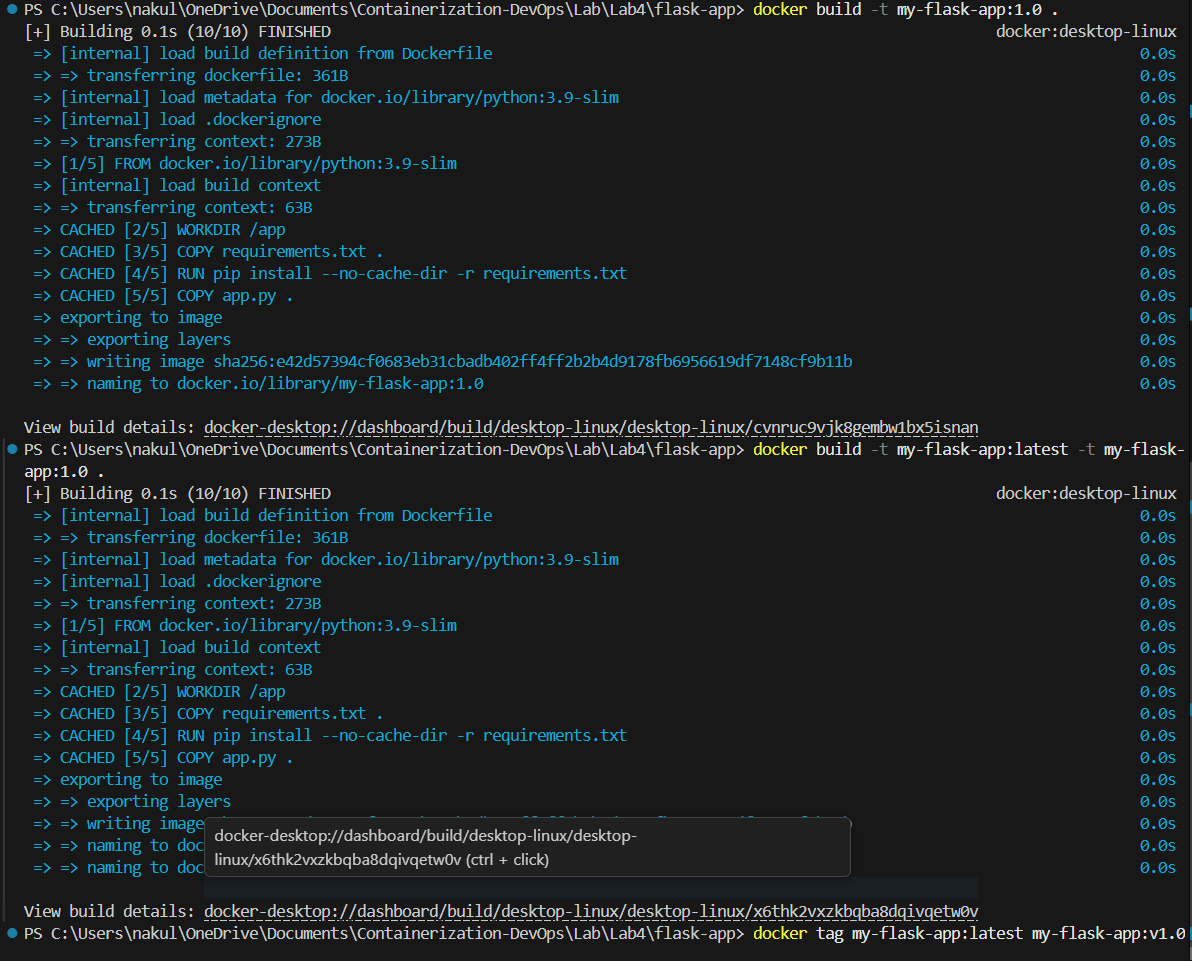
Step 2: Tagging Images
docker build -t my-flask-app:1.0 .
docker build -t my-flask-app:latest -t my-flask-app:1.0 .
docker tag my-flask-app:latest my-flask-app:v1.0
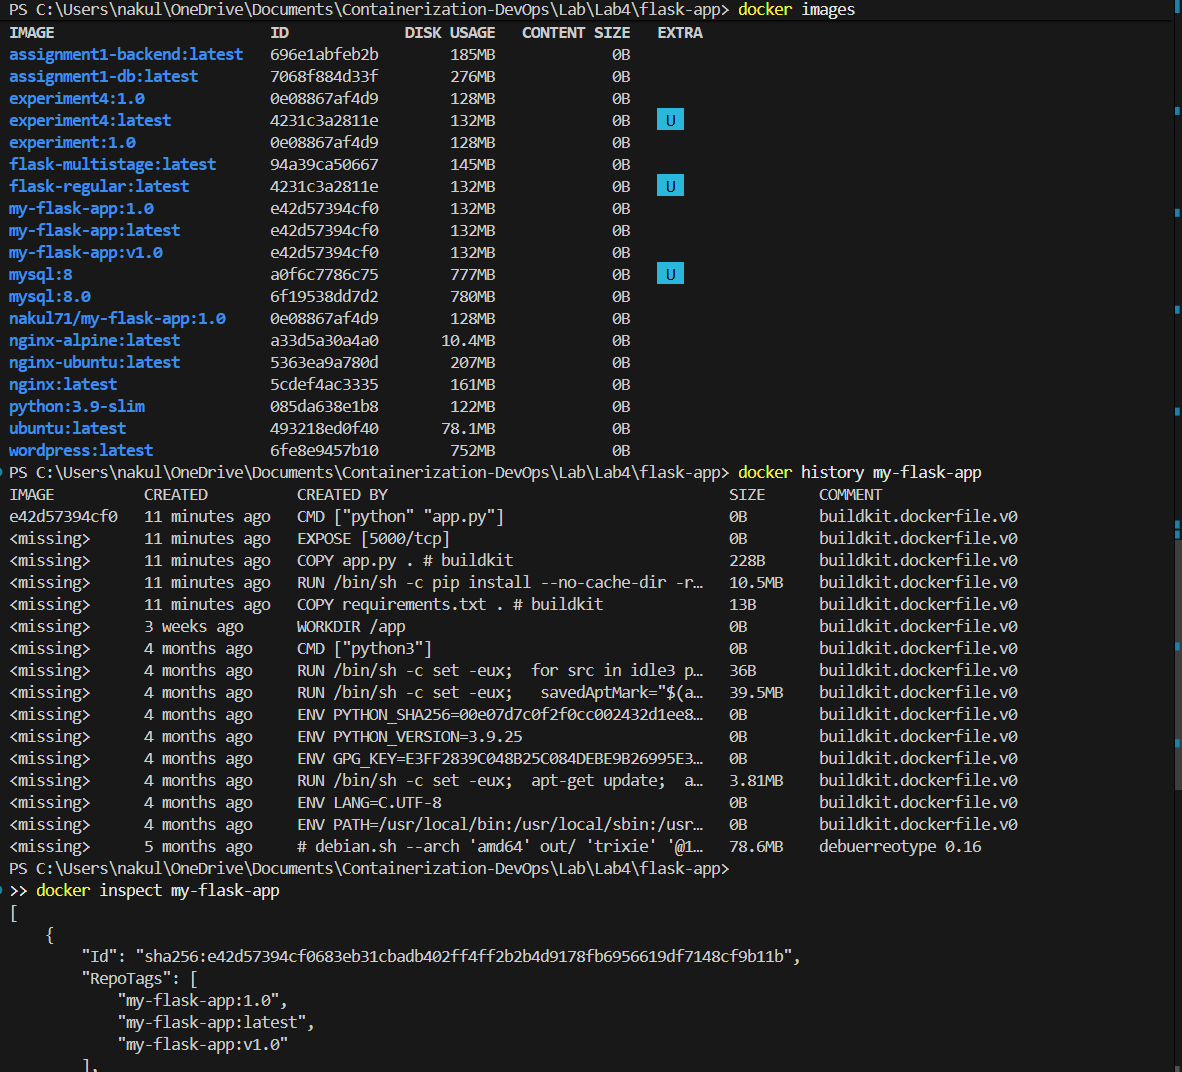
Step 3: View Image Details
docker images
docker history my-flask-app
docker inspect my-flask-app
Part 4: Running Containers
Step 1: Run Container
docker run -d -p 5000:5000 --name flask-container my-flask-app

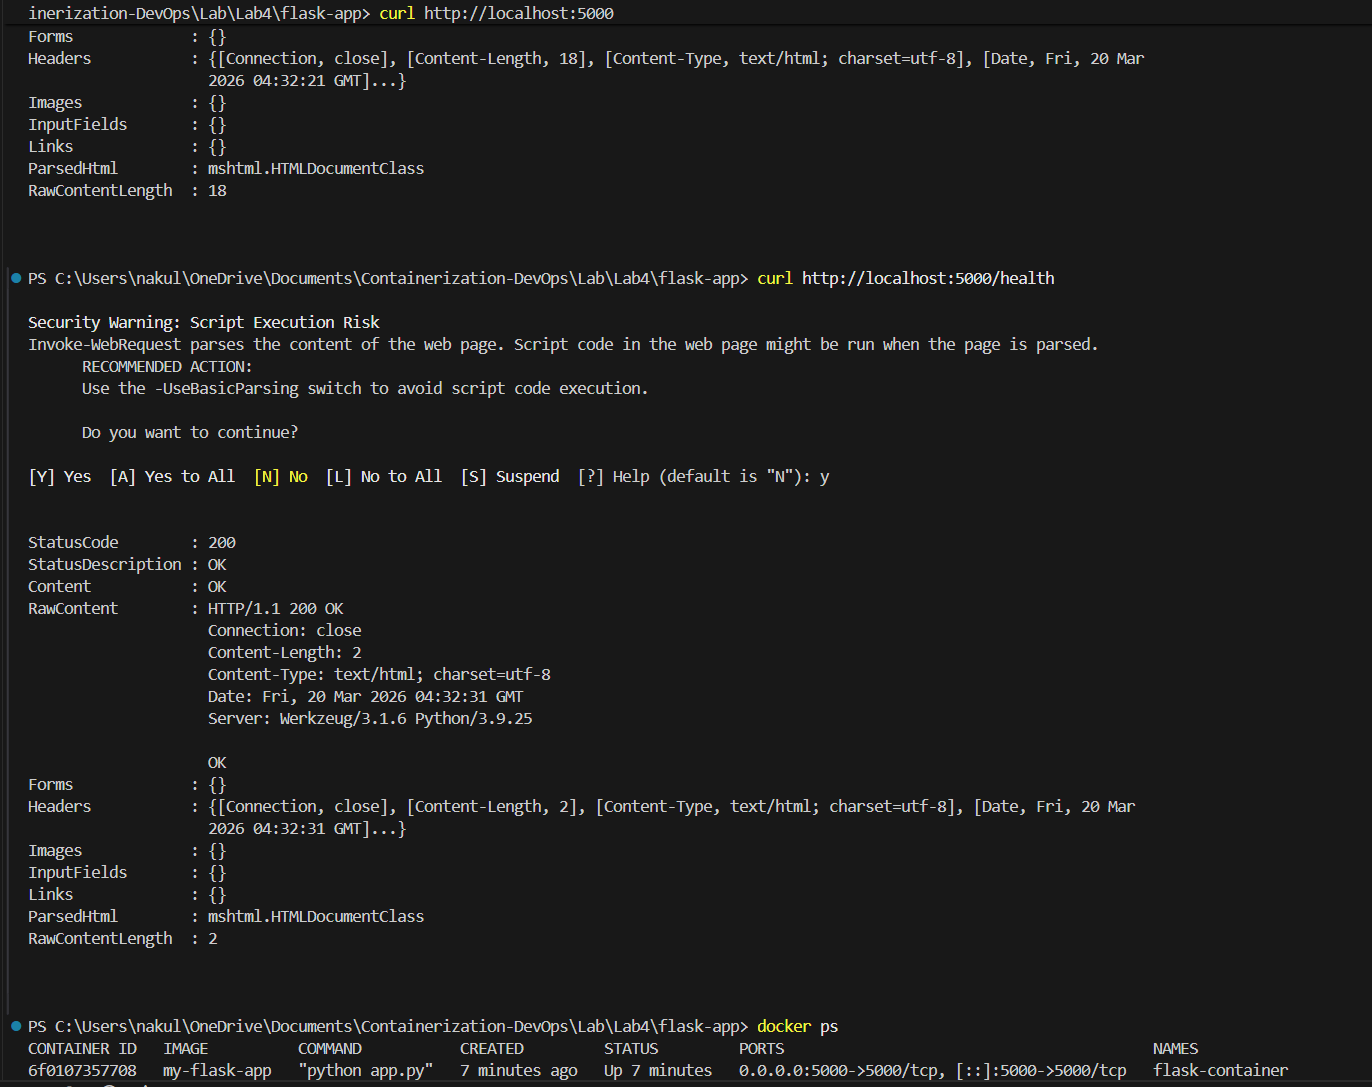
Step 2: Test & Manage Container
curl http://localhost:5000
curl http://localhost:5000/health
docker ps
docker logs flask-container
Step 3: Stop & Remove Container
docker stop flask-container
docker rm flask-container
Part 5: Multi-stage Builds
Why Multi-stage Builds?
- Smaller final image size — only runtime dependencies included
- Better security — build tools not present in final image
- Separation of concerns — build stage vs runtime stage
Multi-stage Dockerfile (Dockerfile.multistage)
# STAGE 1: Builder stage
FROM python:3.9-slim AS builder
WORKDIR /app

COPY requirements.txt .
RUN python -m venv /opt/venv
ENV PATH="/opt/venv/bin:$PATH"
RUN pip install --no-cache-dir -r requirements.txt

# STAGE 2: Runtime stage
FROM python:3.9-slim
WORKDIR /app

COPY --from=builder /opt/venv /opt/venv
ENV PATH="/opt/venv/bin:$PATH"

COPY app.py .

RUN useradd -m -u 1000 appuser
USER appuser

EXPOSE 5000
CMD ["python", "app.py"]
Build & Compare
docker build -t flask-regular .
docker build -f Dockerfile.multistage -t flask-multistage .
docker images | findstr flask-
Results: | Image | Size | |——-|——| | flask-regular | 132MB | | flask-multistage | 145MB |
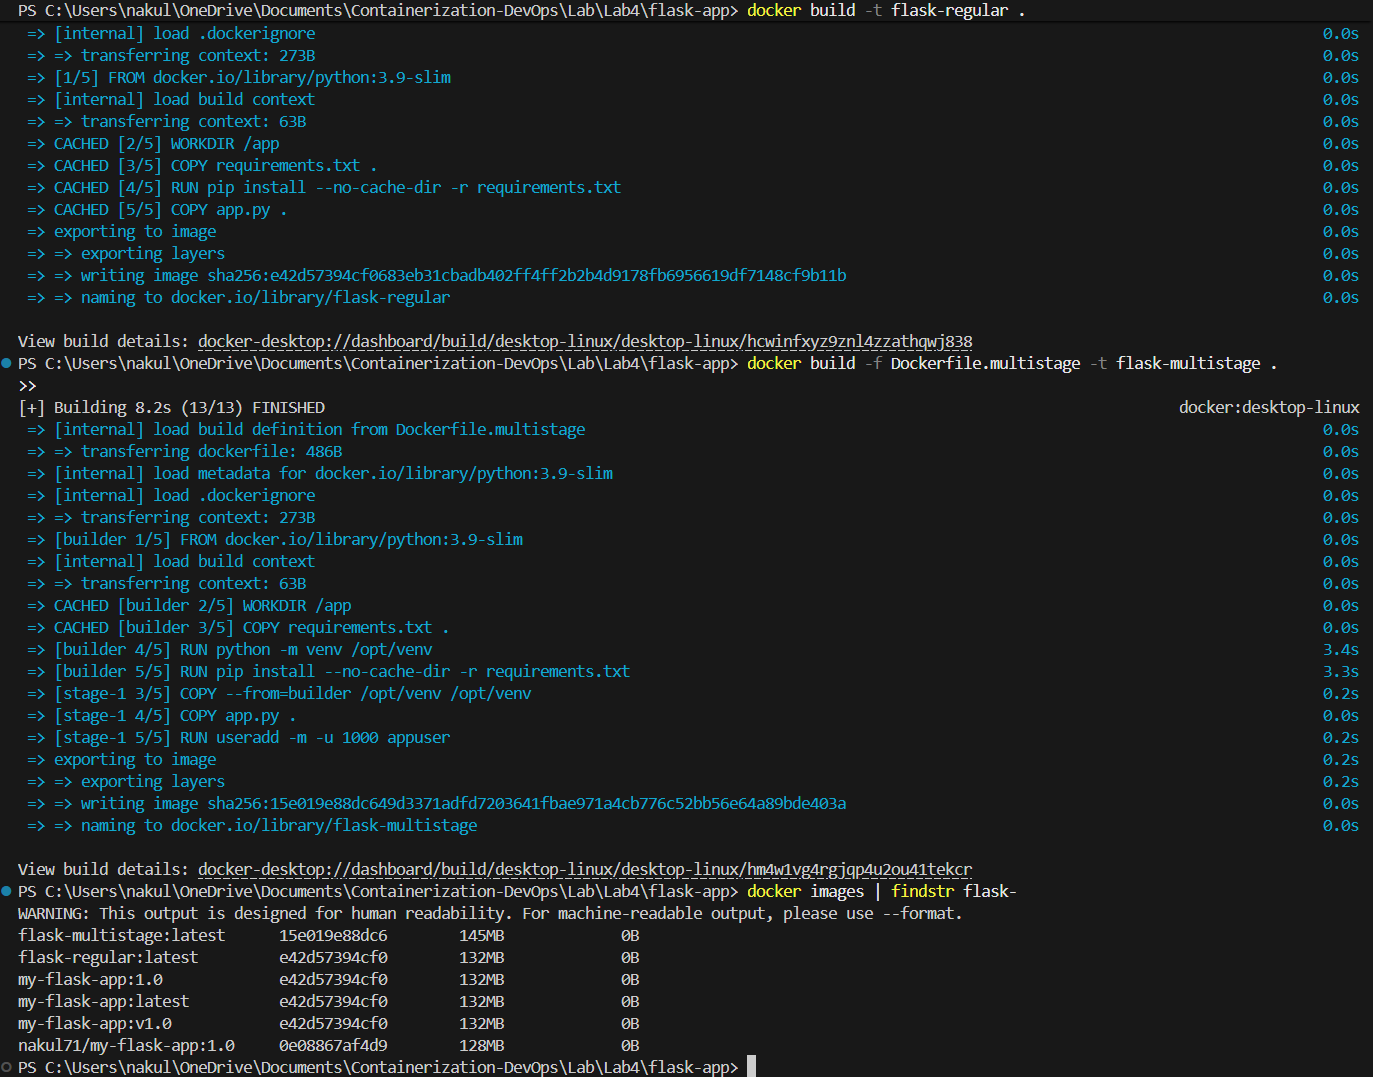
Note: The multi-stage build includes a virtual environment and a non-root user for better security practices, which adds slight overhead. The benefit of multi-stage becomes more significant with larger applications that have heavy build dependencies.
Part 6: Publishing to Docker Hub
docker login
docker tag my-flask-app:latest username/my-flask-app:1.0
docker tag my-flask-app:latest username/my-flask-app:latest
docker push username/my-flask-app:1.0
docker push username/my-flask-app:latest
docker pull username/my-flask-app:latest
docker run -d -p 5000:5000 username/my-flask-app:latest
Part 7: Node.js Example
Application Files
app.js:
const express = require('express');
const app = express();
const port = 3000;

app.get('/', (req, res) => {
  res.send('Hello from Node.js Docker!');
});

app.get('/health', (req, res) => {
  res.json({ status: 'healthy' });
});

app.listen(port, () => {
  console.log(`Server running on port ${port}`);
});
package.json:
{
  "name": "node-docker-app",
  "version": "1.0.0",
  "main": "app.js",
  "dependencies": {
    "express": "^4.18.2"
  }
}
Dockerfile:
FROM node:18-alpine
WORKDIR /app

COPY package*.json ./
RUN npm install --only=production

COPY app.js .

EXPOSE 3000
CMD ["node", "app.js"]
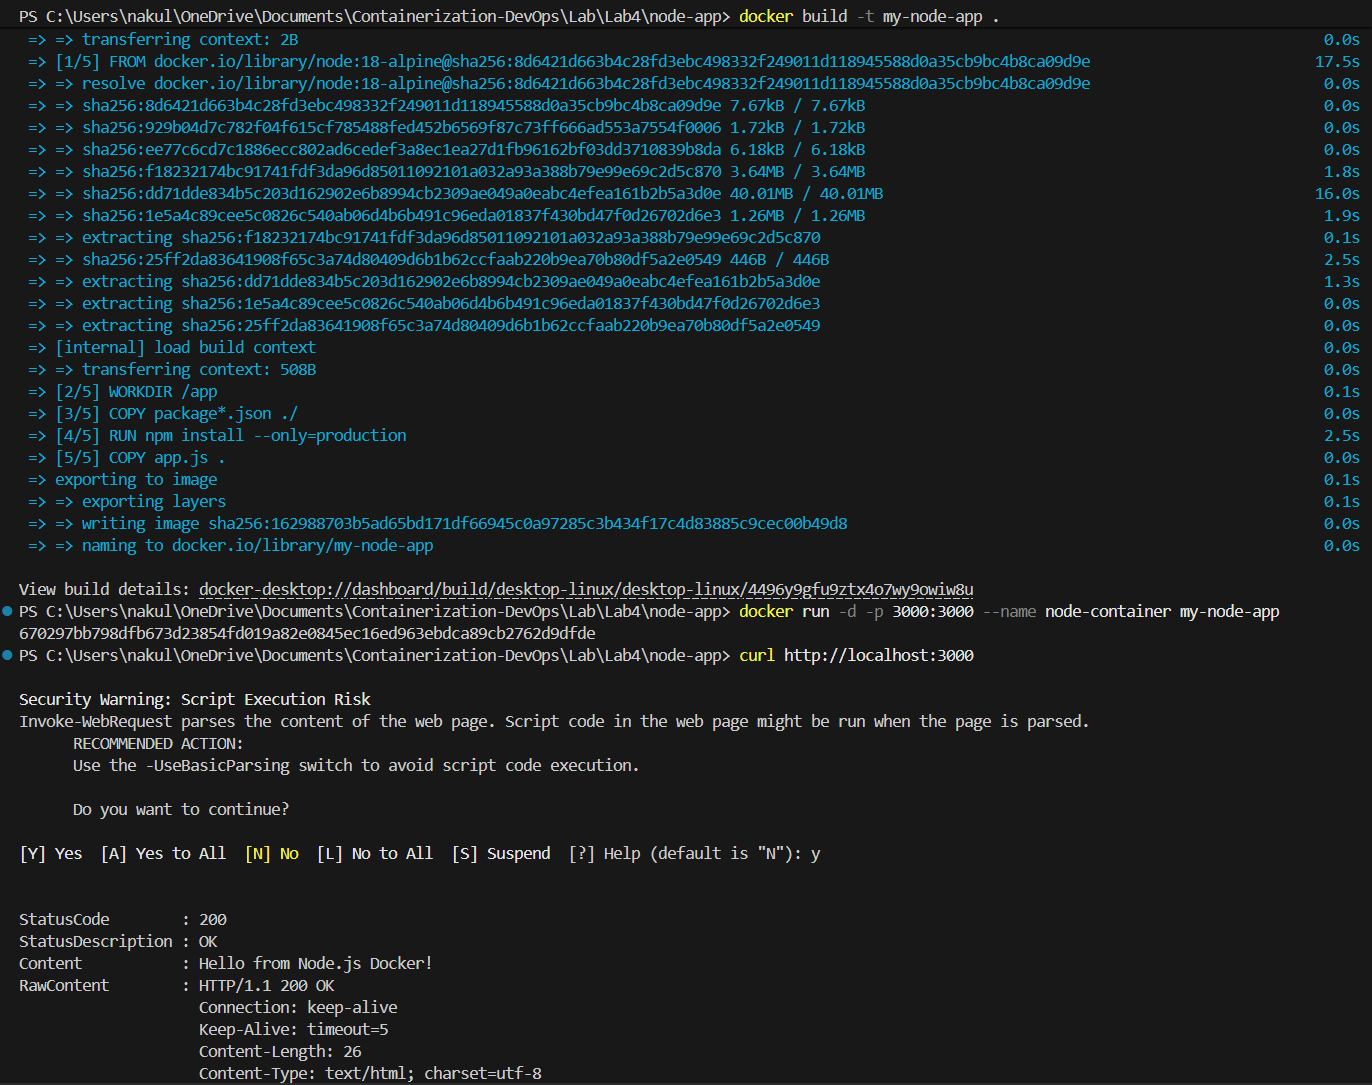
Build & Run
docker build -t my-node-app .
docker run -d -p 3000:3000 --name node-container my-node-app
curl http://localhost:3000
Container Status & Logs
docker ps
docker logs node-container

Part 8: Practice Exercises
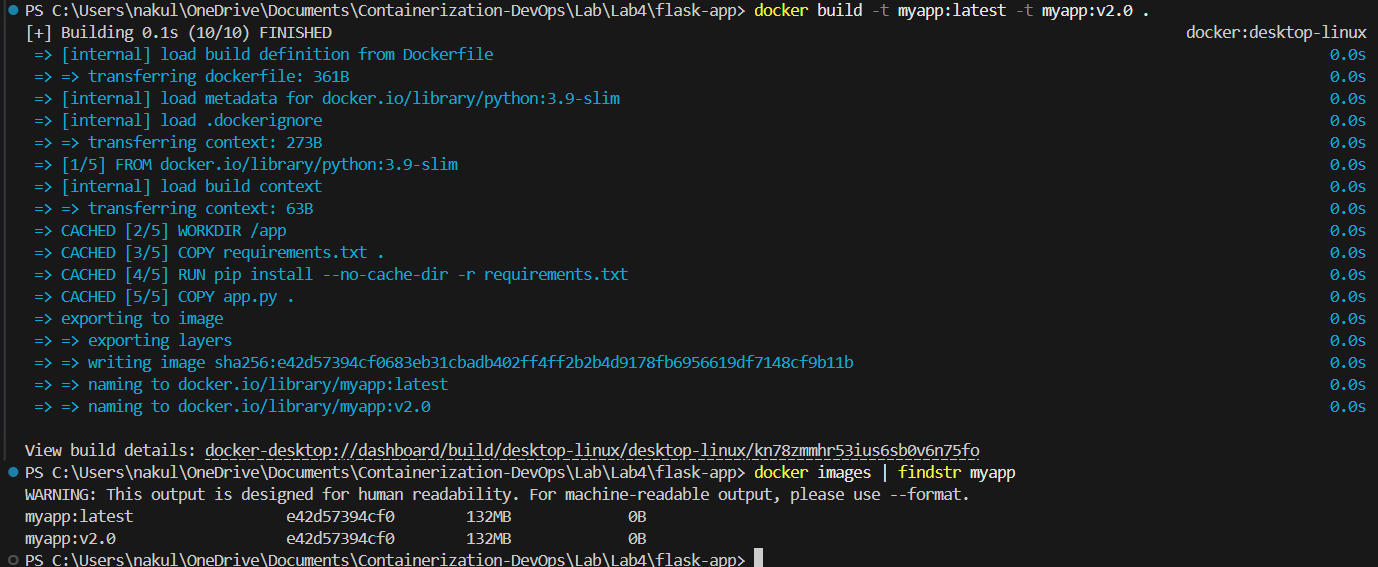
Exercise 1: Multi-tagging
docker build -t myapp:latest -t myapp:v2.0 .
docker images | findstr myapp
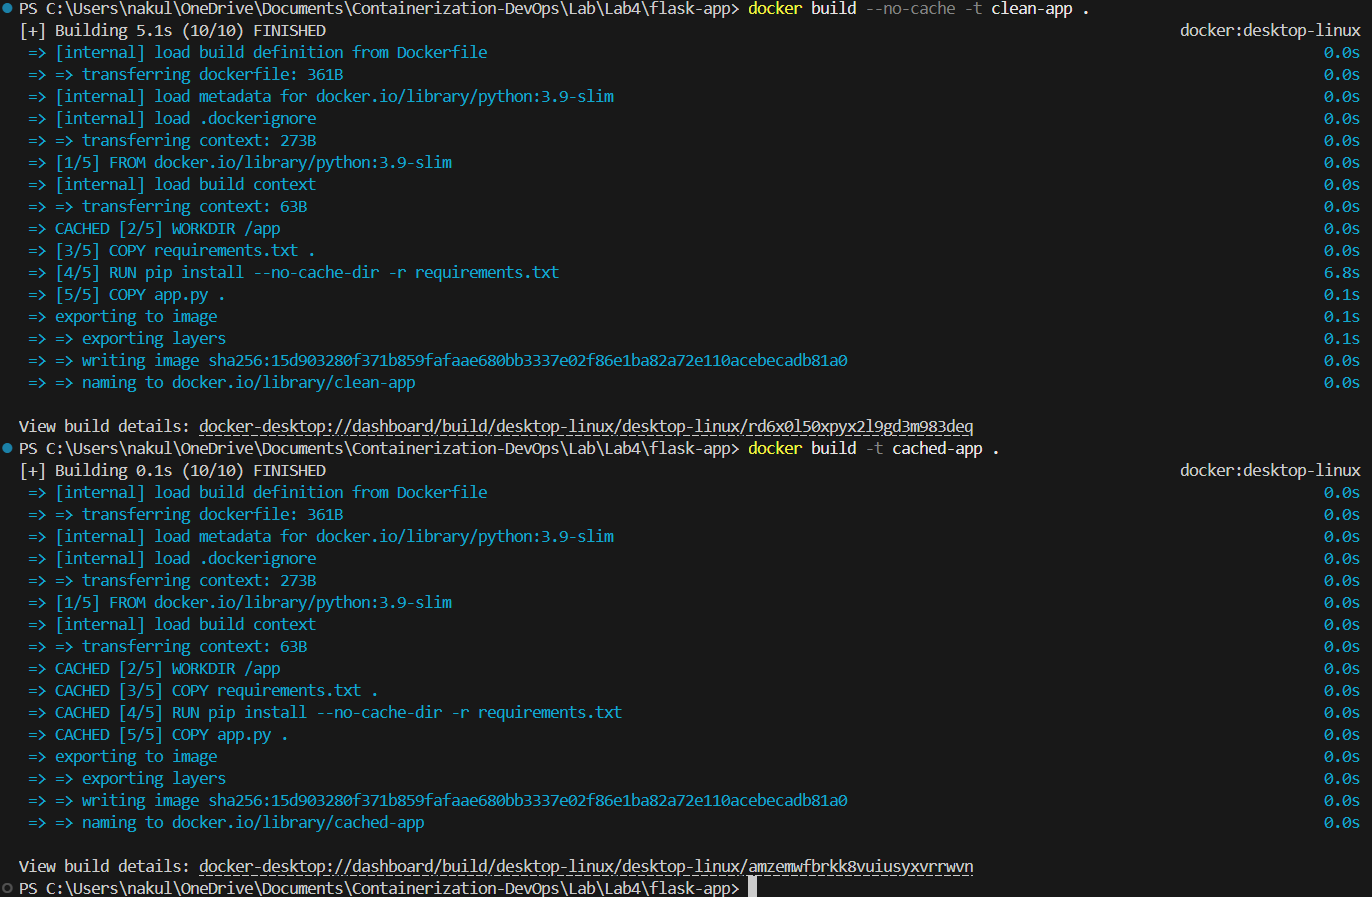
Exercise 3: Clean Build vs Cached Build
docker build --no-cache -t clean-app .    # ~5.1s (no cache)
docker build -t cached-app .              # ~0.1s (cached)
Results: | Build Type | Time | Cache Used | |———–|——|————| | Clean (no-cache) | 5.1s | ❌ No | | Cached | 0.1s | ✅ Yes |
The cached build is significantly faster as Docker reuses unchanged layers.
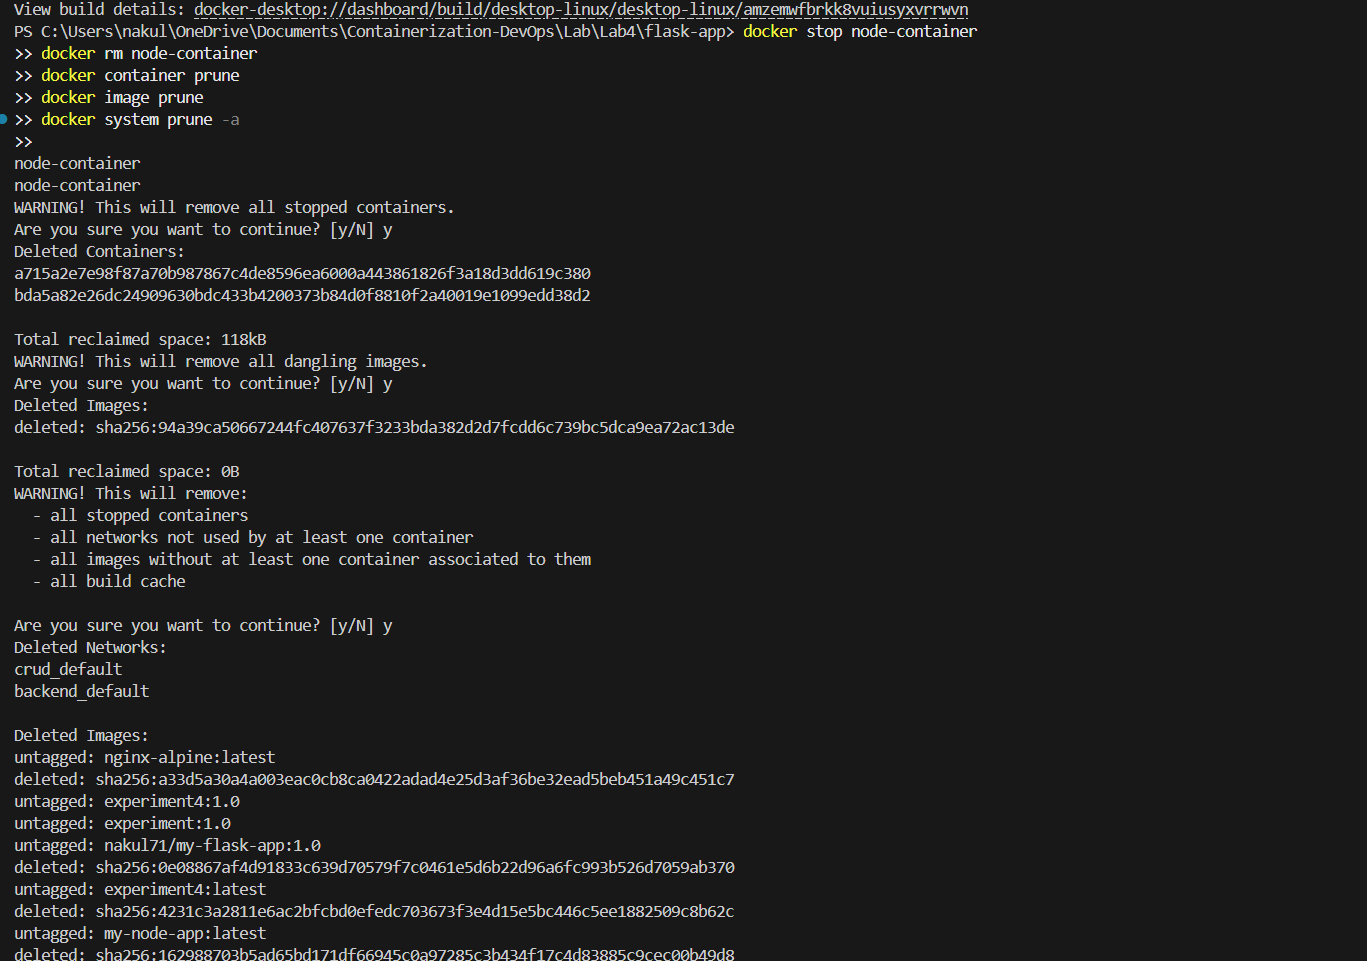
Cleanup
docker stop node-container
docker rm node-container
docker container prune
docker image prune
docker system prune -a
Docker Commands Cheat Sheet
| Command | Example |
|---|---|
| Build | docker build -t myapp . |
| Run | docker run -p 3000:3000 myapp |
| List containers | docker ps -a |
| List images | docker images |
| Tag | docker tag myapp:latest myapp:v1 |
| Login | docker login |
| Push | docker push username/myapp |
| Pull | docker pull username/myapp |
| Remove container | docker rm container-name |
| Remove image | docker rmi image-name |
| Logs | docker logs container-name |
| Exec | docker exec -it container-name bash |
Key Takeaways
- Dockerfile defines how to build a container image step by step
- .dockerignore improves build performance and security
- Tagging enables proper image versioning and organization
- Multi-stage builds separate build and runtime for smaller, more secure images
- Docker Hub enables sharing and distributing images
- Always test locally before pushing to production
- Cleanup regularly using
docker system pruneto reclaim disk space
🔗 Navigation
| Previous | Home | Next |
|---|---|---|
| ← Lab 3 | Main README | Lab 5 → |